Equipment for Hire
Equipment for Hire
Engineering Solutions
Engineering Solutions
Industrial Solutions
Industrial Solutions
Power & HVAC
Power & HVAC
Top tips for sanding wood floors
Learn how to sand your timber floors like a pro with the right sanding machine
Sanding is a simple and cost-effective way to breathe new life into tired or damaged wooden floors. This can involve full sanding and refinishing of hardwood or engineered timber floors – laminate flooring can’t be sanded – or more simple floor care such as buffing to remove light scratches and imperfections.
Here, we answer some common questions on hiring the right floor sanding machine in Australia, and offer some pointers on getting started.
What type of floor sander do I need?
Drum sanders, belt sanders, orbital sanders and floor edgers all play a part in sanding back wooden floors. Read on for advice on choosing the right floor sanding machine for the job.
-
Drum floor sanders: Suitable for heavy-duty sanding, these walk-behind machines remove more material per pass than belt sanders and can cover large areas more quickly. If your timber floors have deep scratches; old varnish that needs removing; or warped boards that need levelling, the powerful motor and aggressive cutting motion on a drum sander will help you to get the job done quickly and efficiently.
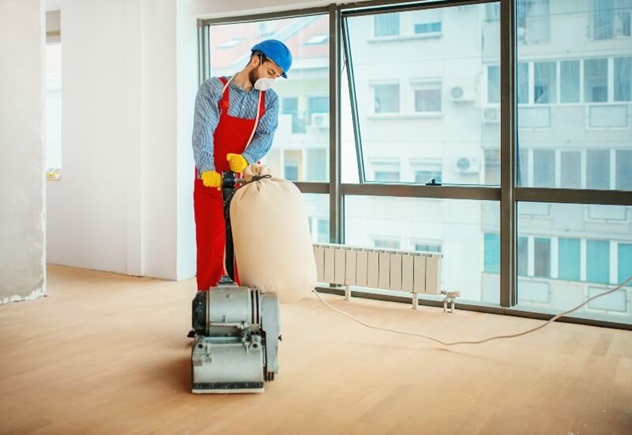
Drum floor sanders are a powerful solution for sanding large areas
-
Belt sanders: Available in handheld and walk-behind models, belt sanders are suitable for similar floor conditions as drum sanders. Belt sanders use sanding belts in various grits to rapidly remove wood layers, scratches and finishes, saving you time when sanding large areas like timber floors and decking.
-
Edging sanders: Floor edgers can sand right up to walls or skirting boards, and are also useful for getting into corners and harder to reach areas.
-
Orbital floor sanders: Gentler and easier to control than a powerful drum sander or belt sander, orbital sanders work well for light to medium sanding or polishing boards. Sandpaper is attached to a plate, which moves in a circular motion for a smoother finish. Random orbital sanders also move back and forth, resulting in less swirl marks.
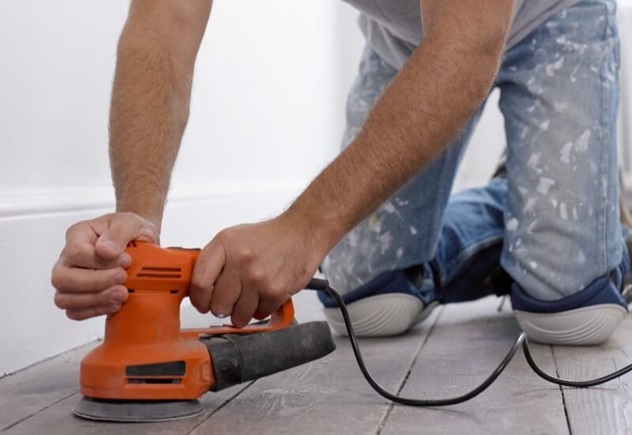
Orbital sanders offer more control than drum or belt sanders, and are better suited for light sanding or polishing
Always choose a floor sander with a built-in dust bag – this will improve air quality where you are working and reduce the spread of sawdust into neighbouring rooms.
What else do I need to sand a floor?
-
To get started you’ll need a broom (or vacuum) to remove dust and debris.
-
Sandpaper or sanding belts are a given – although the type will depend on the condition of your timber floors. Use 40-grit sandpaper for floors that need a lot of work, 60-grit to 80-grit grit for floors in reasonable condition.
-
You’ll need a hammer and nail punch to tap in any loose nails, preventing your floor sander from snagging on them.
-
To finish your floors you’ll need methylated spirits to prepare boards for varnishing; varnish and a brush to apply it; and a mop and bucket.
-
And finally, to work safely with this power tool you’ll need a dust mask, safety glasses and earmuffs.
How do I sand my wooden floor?
1. Preparing your sanding area
-
Before sanding, apply filler into any small gaps and cracks, and fix any nails that are poking up.
-
A good sweep of the floor area before sanding will improve the quality of your finish.
-
Close any doors leading to your work area to prevent the spread of dust, and open nearby windows for ventilation.
2. Setting up your floor sander
-
Fit sandpaper to the drum or plate of your sander, ensuring a tight fit. (If your sander drum is too tight, apply some fine sawdust inside the belt to help slide the sandpaper on).
-
Check that the drum of your floor sander is levered / lifted off the floor to prevent accidental sanding when you start up the motor.
-
Ensure the dust bag is securely fitted to your sanding machine.
3. Sanding
-
For best results, move the floor sander in the same direction, working along the grain one row at a time. Move slowly and evenly for a consistent finish.
-
At the end of each row lift the drum off the floor and wheel the sander back to the start of the next row – remembering to lower it gently to begin sanding again.
-
Once you finish sanding, sweep up and complete a second pass using finer (i.e. 120-grit) sandpaper.
-
To change the sandpaper or empty the dust bag at any stage during sanding, remember to turn the sander off and unplug it from the wall first.
4. Sealing
-
Applying varnish will lock in your finish and protect your floors or decking from future wear and tear.
-
Wait until the sanding dust has fully settled; then vacuum (or sweep) your area thoroughly.
-
Wipe the floorboards with methylated spirits and leave to dry completely.
-
Apply 1-2 coats of varnish, in-line with the grain of your floorboards.
-
Always wear a mask and open windows for ventilation.
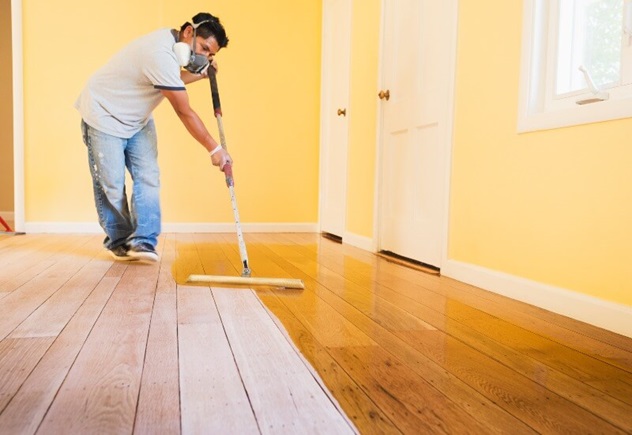
Floor varnish fumes can cause drowsiness, headaches and dizziness. Always wear a mask when sealing floors
To hire a floor sanding machine across Australia, call 13 15 52 or find your local branch.
SHARE THIS ARTICLE
By submitting this enquiry you agree to Coates's Communications Terms & Conditions